[SPRITES] 3D to 2D: Making Weapons the Fun and Easy Way!
by Cardboard Marty Sat Jun 16, 2018 9:18 pm
Original thread on ZDoom Forum: https://forum.zdoom.org/viewtopic.php?f=39&t=60965&p=1059405


Hello! It's your friendly neighborhood Marty! If you aren't familiar with my work, I'm the guy who still hasn't released The Space Pirate, the lead artist for Agent Diaz: The Last Hours of Purity, and I also have my own terribly-named resource thread
! I'm here today with an exciting and easy peasy way of making new weapon sprites for your mod!
We're going to be tackling the core of gameplay mods itself! As a creator, finding unique weapon sprites that haven't been overused can be tough! Especially if you aren't a phenomenal artist capable of churning out beautiful hand-drawn sprites that someone will immediately put in their new Brutal spin-off. Today I'm going to teach you, yes YOU, how to make great weapon sprites utilizing 3D model rips! Remember, this is my method and there might be way better methods than this. Creating sprites is all about putting your personal touch and crafting your own signature way of doing things!
OUR GOALS FOR TODAY:
- Choosing a spiffy weapon and putting it in Doom!
- Doing so relatively easily and quickly!
- HAVING FUN! (Not optional!)
Alright, let's go over the tools we'll be using today!

For this tutorial I'll be using two programs: XPS Posing Studio and Adobe Photoshop. XPS is a posing program made for posing waifus or something, but we'll be using it with good intentions! It's also pretty easy to use! Photoshop needs no introduction, as I'm sure you're aware of what it is.
NOTE: Any of these two programs can be substituted with whatever you're familiar with for the most part. We will be using a Photoshop exclusive feature that I'm not sure is present in GIMP and other alternatives. As for XPS, if you are familiar and more comfortable with Half-Life model viewer, Garry's Mod, or anything similar, that's totally okay!
If you're using Photoshop with me, go ahead and grab this file made by torridgristle!
With your toolbox open and ready, let's get to it!

Before we start, get a nice tall glass of water and put on some tunes! Preferably a playlist so you're not wandering off and getting distracted, something that gets you HYPE AS HELL! With that out of the way, LET'S GET to WORK!

Our first step is our most important! XPS models are probably easiest to find on DeviantArt.com. If you're anything like me, your preferred way of browsing DeviantArt should be with the Mature Content filter turned on and in an incognito window just in case. Because of the nature of XPS and it's most used purpose (unless you are okay with seeing a bunch of nude models) this should make things simple. We'll do a search for "XPS weapon", which should yield a ton of goodies. You might find these under "XNA Lara Models" as well, as that was a previous name for XPS. The weapon I chose is from Mass Effect 3! You'll want to plop whatever you get in XPS's data folder, and then in it's own little sub-folder for safe-keeping.

With our model tucked away in the data folder, we'll bring it into XPS by going to FILE - Add model(s). It should open up a window which will allow you to select the model we downloaded earlier.

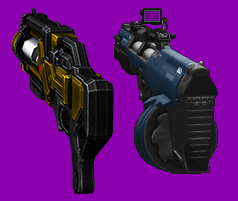
There she is! I quite like Mass Effect's weapon design. This particular model looks pretty cool, I think it'll translate great into a Doom sprite! From here, we'll pose it by clicking and dragging around the canvas. We can use the mouse wheel to move in and out as well. Keep in mind if your model has multiple bones like mine, you can even manipulate certain parts with the panel and sliders on the right side! Pretty neat! Ideally, we'll want this posed pointing towards our opposition. If you have a good reference sprite, try to align the model to be angled the same as that reference. You'll see my reference later in this tutorial! Keep in mind that even though I'm making an angled weapon for this tutorial, you can also center this weapon as well if you so desire! It's in your hands!

During this beginning phase, these are the most important steps! Lighting can be very tricky, especially if you're relatively new at this. Typically, your light source is going to be coming from the upper left, so in XPS to create that light source, we're going to go to OPTIONS -> Lightning parameters... This should bring up a dialog box, as seen on the bottom right of the picture below.

Bump up that light intensity! Use the angle horizontal and angle vertical to position your light. Try to imagine an angry sun at the top left of your gun, ready to swoop down at any moment. You can also mess with the shadow depth to really give it a nice, life-like look! You can use up to three lights, but honestly, we really only need the one. If everything looks good to you, we can save a picture of this model by going to FILE -> Save image. I tend to save mine at 300%, uncheck the render logo box and make sure the save alpha channel box is checked! THIS IS IMPORTANT!. This will save a nice high-resolution version of our weapon with a transparent background! Easy peasy!

Let's crack open Photoshop and start a blank canvas. I personally default to 1000x1000 pixels, but whatever gives you a nice comfy space to work in is all good. We'll start out by creating a background and coloring it purple. You can also color it cyan! This will be important as the file we grabbed from torridgristle's post earlier will be coming in handy relatively shortly. I'll let you know when we're clear to change it!
Now, I grabbed another weapon I've made as a good size reference and put that on its own layer. We'll grab the .png that we created with XPS earlier and drag it into Photoshop! Remember when resizing that Doom stretches sprites vertically, so smushing it down just a tiny bit is key!
It is EXTREMELY important
to note that last sentence if your weapon has any rounded parts on it, like my example weapon!PROTIP: If you want to see what your gun will look like when stretched, go to VIEW -> Pixel Aspect Ratio -> Custom Pixel Aspect Ratio... ->. Change the factor to 0.8! If everything looks good, you can set it back to square pixels!
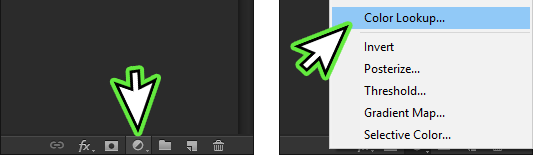
Next up, let's create a Color Lookup adjustment layer. What this does is put anything that is below it in a certain palette, and with torridgristle's file, this will put the image in the Doom palette. You can find this at the bottom of the layers panel with the half-moon looking icon.
PROTIP: NAME YOUR LAYERS! It'll make things easier on you!

This will, of course, palettize our image. This will also make the weapon's anti-aliased edge incredibly easy to remove! Our next step will be to select the weapon and background and Copy Merged by going to Edit -> Copy Merged or alternatively using the keyboard shortcut Shift + CTRL + C. Paste that, make sure it's underneath your primary weapon layer (and lined up as well). We can now remove or hide the Color Lookup adjustment layer and get to cutting this baby out! Wow, what a gross sounding description!
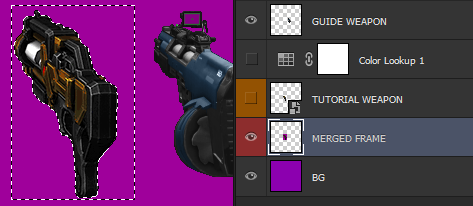
Now we'll use the Magic Wand with the Anti-alias checkbox at the top UNCHECKED! Give this wand a Tolerance of 5 (or more if you're feeling daring) and select the purple/cyan area around the gun on our previously pasted merged image. Make sure the gun layer above it is turned off so we can see what we're selecting! After you've gotten all the purple bits selected, NUKE EM by pressing the delete key. You can then manually clean or add to some of the edges. Next, we'll CTRL + CLICK on our Merged Layer, select our actual gun layer, and then CTRL + SHIFT + I to invert our selection! Press delete, and taa-daa! Cleaned edges! We can change the background that we're editing on to another color that's easier on the eyes, but for the rest of this tutorial mine will stay purple for reasons unknown.


You could call it a done deal here and move on, but with a little more love and care, we can make this new weapon really pop! Let's make a new folder (using the folder icon at the bottom of the Layers panel), CTRL + CLICK on our weapon layer, then press the Mask icon, also located at the bottom of the Layers panel (it will look like a rectangle with a circle in it). This will create a folder with the weapon as a mask, that way we don't have to worry about cleaning up the edges for our adjustments.
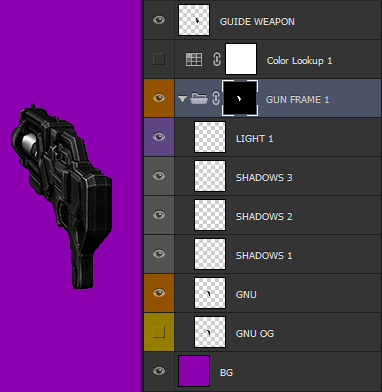
What I've done here is desaturated the weapon completely to make it easier to shade. This is an optional step, but I think it'll make our end result really pop! After that, create a new layer in our group and use a black, soft brush about 2px or 3px and go around some of the edges. REMEMBER THE ANGRY SUN LOOMING OVER THE TOP LEFT OF OUR GUN! He's still there, even if you can't see him! Here, you can really trace some of the edges of your weapon to make some of the details pop more. You'll see in the above image I shaded the circular part a bit more and accentuated some of the details. You can mess with the opacity of the shadow layers as well! I also did the same thing, but with a white brush to get some highlights in there.
The purpose of creating these layers is to make ensure we're non-destructively editing. You could theoretically use the Dodge and Burn tool and do much of the same on the actual gun, but with this method if you make a mistake (or notice you made a mistake later), you can just erase or edit the Shadows or Light layer directly. Non-destructive editing isn't mandatory, but it's extremely helpful!
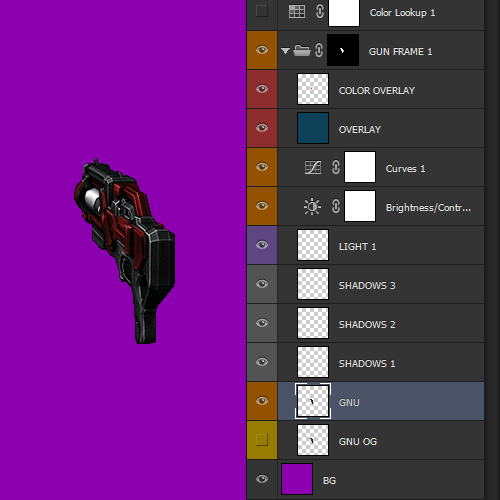
With all that out of the way, I've created two new adjustment layers, one for Brightness/Contrast and another for Curves. I use the brightness/contrast to really bring out the depth of the weapon, and curves just to bump it up a little more. Next, I created a layer that was completely dark blue and set the layer blending mode to Soft Light at about a 12% opacity. This gives it a slight blue-ish tint to make it really pop out. Afterwards, I created another layer to color certain parts of the weapon red. Make sure to use a hard brush for this part so those colors feel like they're really a part of the weapon! You'll see I deviated from the original weapon and made the handle thing red as well. Here, I set the layer blending mode to Overlay with 70% opacity so the red didn't come out too strong.
These details might not be applicable to your weapon, but I find myself doing this for quite a few weapons I've made using this method. Experiment with different blending styles to see what makes your sprite look the best!

We've gotten past the most difficult part! Now we can dork around with hands. There are plenty of hand resources to go around, such as this topic or some of the hands I've released in my resource thread. This can be difficult, especially if you find yourself needing a hand that doesn't quite fit what you're looking for. It's outside of the scope of this tutorial, but make sure that the hand you use fits naturally and doesn't look too weird!
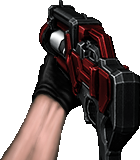
Luckily, I had a hand from The Space Pirate that seemed to fit okay! You'll notice I didn't hand the bottom part of the weapon. The player normally won't see this part, but this is also a tricky hand position since the weapon I'm using has a really uncomfortable-lookin thumbhole that I'd need to make a new hand for. For the most part we can probably forget that portion. For an extra bit of love, create a new layer under the hand and cast some shadow where the hand meets the gun.

And that's it! You've done it! While this tutorial seems daunting, these steps are incredibly easy once you get them down, and I'm confident you'll be able to crank out weapon sprites in no time! BE SURE to CREDIT THE MODEL RIPPER AND WHERE THE MODEL CAME FROM!. People worked hard to get these resources out!
Thanks for reading this tutorial! If you liked it or found it helpful, or if you have suggestions, questions
or hatred, leave a comment below at the forum!