[Tutorial] Revolving Monster Sprite
From the original post: http://forum.zdoom.org/viewtopic.php?f=39&t=35856&p=676658 by Eriance
Since I've never drawn a revolving sprite before until making my latest rendition of DE's Guardian, I had to figure out a good way to make sure the perspective is correct. Here's how I created the sprite, without 3D modeling (which I really need to learn). Keep in mind there are many other methods, and what I state here are nothing but my artistic opinions.
- DESIGN:
Before investing a substantial amount of time into sprite, make sure you have a viable design. It would be
a waste of time to find out half-way that your thing didn't actually fit together in 3D-space, and you end
up scrapping it. I've gone through that many times from past failed spriting attempts. Keep shapes simple,
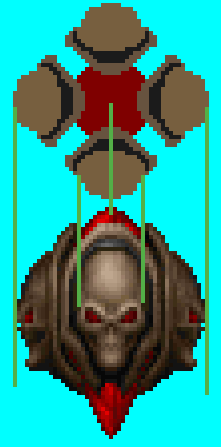
and add detail using bottom-up. For example. My guardian is just a diamond prism. You can start from any
angle sprite you want, but doing the from or sides (in this case, since its radial symetric, it doesnt matter)
are best from my experience.

- TOP-PROJECTION:
When you're drawing something that is revolving, it's hard to visualize how far the parts should move from
their original positions sometimes (at least for me). However, you can help yourself get the right places by
first making this projection from the top. As you can see here, it's roughly lined up with the various
forms on my original sprite (I ended up tweaking the finished sprite a lot afterwards, so they don't
perfectly line up anymore).
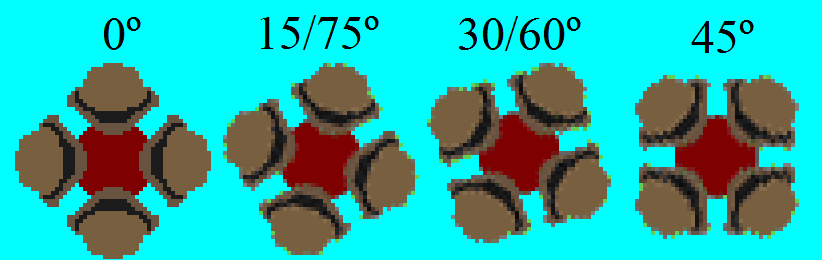
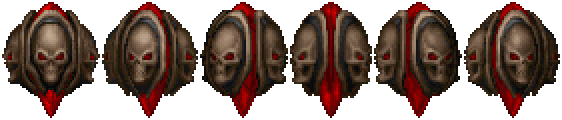
- ROTATED REFERENCES:
Once you have you top projection done, rotate them to generate enough frames for 1 movement. My sprite has 4
symmetrical sides, thus I need to rotate the face 90 degrees for 1 completed movement. I've decided to break
this down into 6 frames, so each is 15 degrees from the normal. Notice that because the design is symmetrical,
you wont need all 6 frames. You can just mirror some of the sprites later to complete the set.
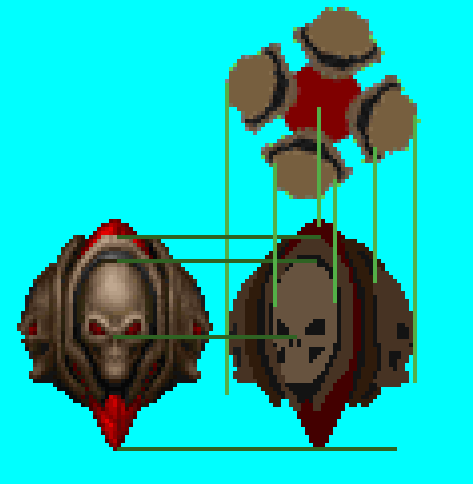
- NEW FRAMES:
Using your reference from step 3, and the original, you can make the new sprite with all the forms in
generally the right positions. Draw the base for coloring. Keep in mind that this type of projection
does NOT account for perspective, so everything is parallel.
You can edit the final sprite later to add some perspective adjustment. But the amount of forshortening
would be relatively small, and probably not noticeable at Doom resolutions.
- COLOR/SHADE:
Color the thing in your program of choice. I did this in photoshop. You'll have to do a lot of pixel
editing afterwards to flesh out the finer details. You'll probably have to move things a round a bit
too to make each frame look consistent.
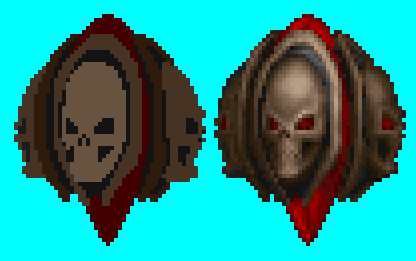
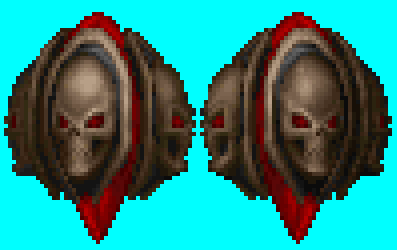
- MIRRORING:
As i mentioned above, you can save yourself time by mirroring as many sprites as possible and end
just editing the mirror image to make them non-identical for more variation. It's up to you really.
Not editing would also be fine since it's animated. Below is the 15 degree frame, mirrored to form
the 75 degree.
- REPEAT:
Finish the rest using the same method. You'll need to do some pixel-editing to make sure the thing
animates smoothly. Depending on how much of a nit-pick you are, this process can take quite a while.
Again, this is one of many methods you can do this, and by no means the most time-efficient. 3D modeling, or using Blox' warping method will generate the base images for editing much faster. However, you will still need to either make a 3D model, or at least make 2+ frames to have enough reference points for the warping program. This method will test your patience, but also give you some practice in attaining some raw ability and experience, which using the software shortcuts won't offer. I hope you all find this useful. I look forward to seeing more custom sprites from new aspiring spriters in the future.
Last edited by Eriance on Tue Apr 02, 2013 12:21 am, edited 3 times in total.